Saturday 19 December 2009

Carburetor refurb.

The carbs in the 1st 3 pictures are as they were when I pulled them off the engine.


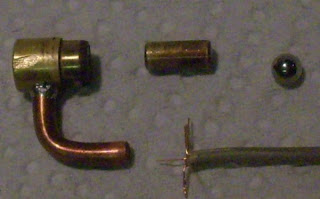
One problem I found were these nozzles were blocked. I managed to clear them with one strand of a wire. This allowed me to attach a hose and flush through with carb cleaner.
The ball, weight and bore for the non return part of the nozzle were cleaned and polished.

All parts of one carb laid out, I changed all the screws to stainless cap heads. All parts cleaned and all bores checked for flow.
All seals have been checked and replaced where needed.

The brackets have been cleaned, wire brushed and spray with a rust inhibiting zinc spray.
All parts put back together with no left over parts.
Some hoses and hose clips were replaced due to perishing.


Tuesday 15 December 2009

Number plate holder.

I drilled off the back plate which just left the light holder/plate bracket.

Parts then stripped of paint and sprayed with a zinc primer then silver spray and finished with a clear laquer top coat.

A couple of stainless dome nuts finishes the look.

The rear mudguard was cut down to level with the bottom of the number plate.
The inner metal part of the mudguard was discarded due the amount of rust on it.
A stainless metal plate with 3 holes support the bracket mounting screws and a tube was glued to the mudguard to feed the light wire back to the frame.
I had a couple of pairs of carbon looking indicators which I stripped and soldered the wires which I took out from the original ones.

Sunday 6 December 2009

Rear upgrade

I bought a new seat cover off ebay some time ago, although the bike came with a seat in good condition it didn't have the original stitching.
The ebay purchase had the original stitching and help with the lines of the bike.
The seat cover was carefully removed and was used again to recover my Suzuki GS500 seat.
I bought an electric stapler especially for this job and some stainless staples.
The seat was placed on the cover all upside down, placed on a stool and press down with a clamp pressing down from the shed roof. This compressed the foam a bit making the pulling and stapling of the cover a bit easier. A few staples in strategic places and the clamp was released and then the cover was fully stapled all the way around.
1st pictures shows the original plain cover that came with the bike.

2nd picture shows the loose cover on top of the foam seat.

Nice line of stainless staples which will not rust.........ever.

Another underside shot.

A new seat stay was made from 5mm stainless bar replacing the rusty old one.
The hinges were rubbed down and given a coat of zinc anti-corrosion paint.

Finally the top side in all its glory,.
Only problem was while being stored in the shed rolled up, I was using my hand grinder and didn't notice a few sparks drifting its way. Hence the couple of small off colour patches on the back seat.

Wednesday 25 November 2009

Front upgrade.

I had to buy another pair of forks from ebay as one of my stanchoins had a large rust spot halfway along the sliding stem.

Parts all stripped with the lowers stripped of paint and polished.
Springs checked and found to be correct for free length.
New seals, dust seals and fork oil were purchased and re-assembled as per the Haynes manual.

Forks rebuilt ready to go back on the bike.

Front and rear wheel got my attention next.
Rear wheel bearings were fine but the fronts still had the old one side open type.
A bit of heat applied and a gentle tap released the bearings.
A bit more heat and bearings in the freezer let the new bearings drop into place.

The wheels looked tired with the paint showing the aluminium through it and the aluminium having a bit of surface corrosion.
The aluminium was cleaned with a scotchbite pad and then polished with autosol.
I decided to brush paint the wheels with QD90 machine paint. An enamel paint which self levels and dries quickly.

Wheels nearly finished, just need new tyres, although there's plenty of tread on them, they've not been on the road for over 7 years and have hairline cracks in the side wall.

Monday 26 October 2009

Petrol tank washer and wiring loom

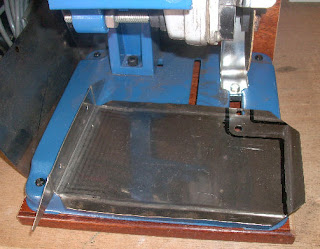
Another rusty bit needing replacing, out with another bit of scrap stainless plate of the same thickness. Covered with permanent marker and scribe around the outside.

Holes drilled at various points.

Over to the cut off grinder and cut roughly into shape. Finish off on the bech grinder and smooth with the abrasive flap wheel. Bent the 2 tabs up in the vice with a bit of hammer force.

On te original there's a notch to stop it rotating when tightening it onto the tank.
I made a small raised dome with an M12 nut and a ball pein hammer in the vice.


A cut with the grinder through the raised dome gives me the anti-rotating edge.

And finally in place ( but without the tank )


The wiring loom had some modifications which didn't coincide with the original wiring diagram.
Everything was put back to standard except a new blade fuse box was used.
The loom was rewrapped with self amalgamating tape.


I put the loom back on the frame and attached with the same tape, the loom holders had mostly rusted away and were ground off before it was sandblasted on painted.


Picture of the frame after painting on a windy day when the shed was tilting over a bit :-)

Tuesday 13 October 2009

Bike lift


Another project to help me with my Vision restoration.
I dismantled the trolley jack and turned some longer bars to put in the longer lifting arms.
The outside is currently made of wood which I expected to be too weak but I needed to develope the distances to make sure it lifts in a parrallel lotion.
It can lift around 100Kgs easily but as suspected the wood is starting to bend.
Pictures show front and back parts and is being designed to carry just one wheel and the centre stand. I will make a small ramp to push the bike onto the lift then put the centre stand down and lift the bike off the ramp.
I still have to make some extra bits like a hinged bar so I can relax the jack, a front wheel holder and some eye bolts on the frame to tie the handle bars down to.
I will get some long metal lengths now to replace the wood so it''ll be strong enough to lift the bike.

I've replaced the wood with lengths of metal and was tested lifting the familly on it a total of over 27 stone/380lb or 171Kg.
I still have the extras to make, but now with a weeks holiday I should get this finish and back to work on the Vision with it lifted off the floor and save wearing my knees out.

Tuesday 8 September 2009

Parts worked on this week

The brake pipe holders were a bit rusty so instead of painting them I had a go at remaking them in stainless steel.


I marked the shape on the plate and drilled the holes.

I cut the shape out with my 4" angle grinder in a cut off holder.

Basic shape all deburred and smoothed with a abrasive flap wheel.

A bit of hammering in a vice and round a bit of bar and one stainless replacement brake pie holder.


Shaft drive boot repair.

The rubber boot was in good codition apart from ahole worn through in it.

The boot is being repaired with a bit of an old inner tube and glued in place with the glue from a bicycle puncter repair kit.


The finished article repaired and cleaned ready to be put back on the bike.

Brake calipers.

Originally the caliper was corroded but I cleaned it up with various abrasives and sent it off for alochroming, an industrial process used to stop aluminium corroding.

Calipers back from the finishers .

Finally finished off in high temperature caliper paint.